Why I Built This
The reason I made this app is to try and get more familiar with Compose Canvas. Although I've had the chance to work with Canvas several times before, I never got used to its weird coordinate system and drawing functions. I consulted with my trusted friend ChatGPT about what could be a good project to learn from, and we came up with this brilliant app idea. It fit the bill perfectly because it requires a custom UI, and it juggles between the x,y coordinate system and radial positioning (because it's a circle).
Implementation
I don't have a good designer friend, nor am I good at designing. Whenever I need to make a UI for a project, I like to think about what I want the app to look like and imagine it in my head. The first image that came to mind was the Pip-Boy from Fallout 4. I imagined a black background with grid lines, radar circles emanating from the center, and a sweeping arm surveying for locations. I also imagined a Vault Boy below the radar to explain the details for each location, but unfortunately I wasn't able to implement that.
Why Is There Math Here?
In my last project, when I experimented with shaders, I had a headache from the amount of math involved. I thought this would be a walk in the park — I mean, we're just drawing circles and lines. But it wasn't that simple. It's not complicated by any means, but it was new to me, and there was some subtle complexity at play. The screen is a flat surface; the radar is a circle. So we need to represent points with their x,y coordinates, but we also need to know the angle and distance relative to the user on the radar UI.
Centering the grid lines was the thing that blew my mind, even though it's the most trivial part. If we draw lines starting from the (0,0) point on the canvas, we'll draw the lines starting from the top-left corner of the phone screen. This makes the lines feel off-center and cropped on the right edge of the screen. To let the lines emanate from the center, we need to calculate the actual center, simply by:
val centerX = size.width / 2
val centerY = size.height / 2
Now we need to calculate how many lines will fit to the left/right and top/bottom of that center:
val stepsRight = ((size.width - centerX) / lineSpacing).toInt()
val stepsLeft = (centerX / lineSpacing).toInt()

val stepsUp = (centerY / lineSpacing).toInt()
val stepsDown = ((size.height - centerY) / lineSpacing).toInt()
And then we iterate over the number of steps to draw our grid lines.
The Sweeping Arm
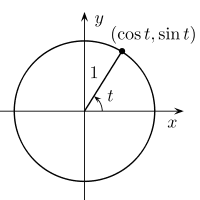
The sweeping arm is a line with one end living at the center and the other end living on the edge of the outermost circle. To animate the arm, we introduce a Compose animation that keeps animating the current angle of the arm between 0 and 360 degrees.
val angle by infiniteTransition.animateFloat(
    initialValue = 0f,
    targetValue = 360f,
    animationSpec = infiniteRepeatable(
        animation = tween(durationMillis = SWEEP_DURATION_MS, easing = LinearEasing),
        repeatMode = RepeatMode.Restart
    ),
    label = "angle"
)
Now that we have the angle, we can easily find the current x,y coordinate for the arm using this piece of math:
fun polarToOffset(angleDegrees: Float, radius: Float, center: Offset): Offset {
    val rad = Math.toRadians((angleDegrees - 90).toDouble())
    return Offset(
        x = center.x + radius * cos(rad).toFloat(),
        y = center.y + radius * sin(rad).toFloat()
    )
}
Accessing the Device Sensors
Thankfully, accessing the device sensors to get the current user direction wasn't that difficult. The libraries themselves make it very straightforward to get what you want. All you need to do is get the device sensor, register a listener to keep observing changes, and provide the listener with a callback to update the current angle when the sensor changes. The interesting part was that the device sensor gives 3D rotation data, while what was needed in the app is 2D orientation information. Looking at the phone screen, it's easy to assume that everything we deal with is 2D. But once I saw the code, it was also very obvious that the device sensors measure everything in 3D, since that's the world we live in.
Getting the current location for the user was also very similar — the Google services library takes care of everything.
Getting Nearby Points
Finally, I can get nearby points and place them on my radar to bring it all together. Okay, so I need to find something free so I can use it. Claude tells me OpenStreetMap is good, so I go with that. Why is that thing so slow though? A five-second wait just to get a few locations 100 meters away. Is it supposed to be slow, or is there something wrong with my query? I'm not sure. Nonetheless, I can still use it, because this is only for fun.
I make my network module and wire everything together. I put my network requests inside a LaunchedEffect and run the app. It doesn't work. I thought I did everything well — why isn't it working? I read the logs, and it says LeftCompositionCancellationException. I'm too impatient, wanting to see my app running, so I paste the error to Claude and tell it to give me the fix — it shouldn't be that hard. The same error persists!
Could there be something wrong somewhere else? I wouldn't say I have Android instincts, but through my work with Claude I noticed that it's not really apt at giving stable keys to effects. I look at the key for good measure, and the key is the boolean flag controlling whether to fetch new points or wait. It starts as true, so the LaunchedEffect starts running, checks the condition, and moves to the next step — but before it moves on, it flips the flag to false and continues. It can't continue, though, since the key has changed, so the coroutine is cancelled, and we have to start all over again.
We provide a stable key and run again. Finally, I can see the points beaming in, my tiny user arrow pointing in the direction my phone is facing.
What Would I Do If This Was a Production App?
This was a very simple and fun project. When I first used the app, I felt nice about completing it. More than that, though, I felt like this could actually be a fun app if I used it in real life. Google Maps spoils all the fun of exploration — all the details of a place are right there. You can know everything about a place before even visiting it. Moreover, navigating to a place requires you to glue your eyes to the phone and follow instructions carefully, unless you want to miss a turn. An app like this, used to explore places and navigate around a city, could actually be enjoyed by people. At least I know I'd use it.
However, several things would need to be added before it could actually be used:
- I need a reliable API to get nearby points, and fast. There's no excuse for waiting five seconds to get the points.
- The ability to filter places by category (cafes, shops, restaurants, etc.).
- More details about each location, so the user can know which ones are more interesting.
- Distinct markers for each type of location, to provide more contrast.
- Some visual cues in the UI, such as buildings or roads, to make it a bit easier to navigate instead of a fully blank circle.